• If you'd like to have my daily paintings delivered right to your email box, just.....

    Enter your email address:

    Delivered by FeedBurner


    All images are Copyright Protected and the property of Jamie Williams Grossman. Paintings and photos displayed on this site may not be reprinted, copied, downloaded, displayed elsewhere, or used for any reason without her written permission.


    Jamie Williams Grossman's Profile
    Jamie Williams Grossman's Facebook Profile
    Create Your Badge


    -------------------------------------

    If you haven't seen the two-DVD set, "The Impressionists", you don't know what you're missing!

    the-impressionists.jpg


    I rented it from Netflix and absolutely loved it. It is an enactment of the lives of Monet, Renoir, Manet, Cezanne, Degas, and other Impressionist painters living at that time around Paris. Fascinating and eye-opening!


Since my post about tubing my own paint, I’ve received many requests for instructions from viewers. Hopefully this demo will answer most of your questions. Many thanks to Marc Hanson for his paint-tubing advice as I got started with doing my own.

There are many reasons for tubing your own paint:
Mix leftover paints when a session is done and save it as a neutral “mud mix” for future paintings;
Make your own paints out of binders and pigments;
Mix various values of grays and tube them;
Premix favorite color mixes;
Purchase quality paints that come in jars, like RGH brand, then tube them yourself;
Buy your favorite paints in very large tubes, and transfer to smaller tubes for travel/plein air work.

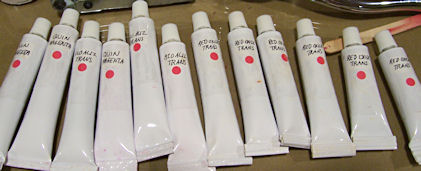
I made up a dozen tubes yesterday of various reds, taking photos along the way to show you how to do it. Most artists will find that they already have most of what they need, except perhaps the tubes themselves! Those can be ordered from online sources such as Dick Blick, Jerrys Artarama, and ASW.
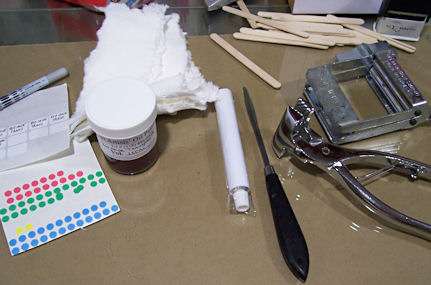
tubing-paint-1-materials-425

Supplies I use are:
Paint tubes (of course!)
Long, straight palette knife. (Width depends on your tube size.)
Pre-cut strips of paper towel
Rubber gloves
Wooden craft sticks
Tube wringer
Canvas pliers
Sharpie marker/marking pen
Packing tape
Little colored dots (optional, but really handy)

tubing-paint-2-filling-425

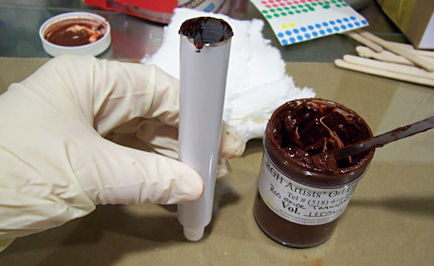
Put on your disposable gloves. Holding the open end of the tube upright, transfer paint into the tube with the palette knife. Place it as far down into the tube as you can. Tap several times as you transfer, so that the paint settles down in the tube and you don’t get air down there. Try to keep the sides of the tube free of paint. When you get 1.5-2″ from the top, scrape out around the side of the tube above the paint level to remove as much paint as possible.

tubing-paint-3-flatten-end-425

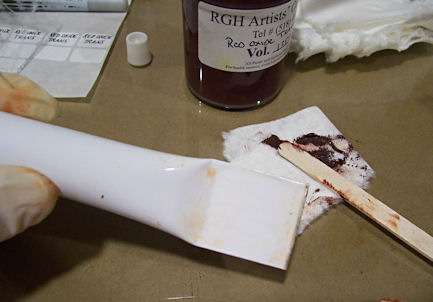
Squeeze the end flat with your fingers, making sure you get out all the air. Use a wooden craft stick on a small piece of paper towel to press out as much paint as you can that remains in the flattened section of the tube.

tubing-paint-4-wringer-425

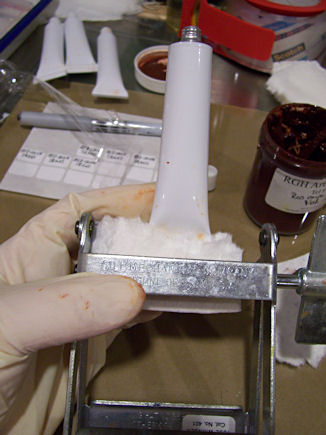
Next you’ll use the tube wringer to crimp that end and prevent paint from escaping. I find that by folding a few thicknesses of paper towel over the tube end first, I can avoid a lot of mess on my tube wringer! That saves me a lot of cleaning time too. If you do happen to get a lot of paint on it, just fold a piece of paper towel and wring it through a few times to remove the paint.

tubing-paint-5-canvas-pliers-425

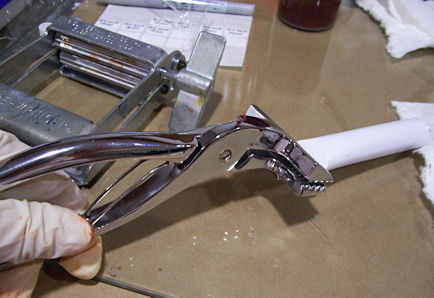
Fold the tube end tightly with your fingers, crimping it with the canvas pliers as you go.

tubing-paint-6-label-425

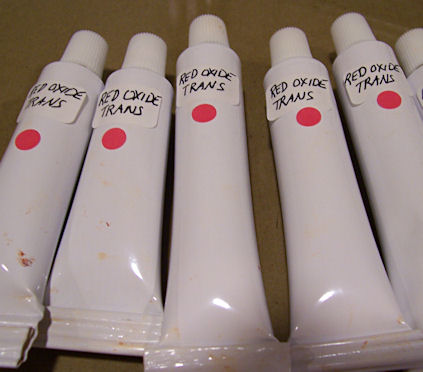
I like to use these little labels on the tubes that I can prepare in advance, but if you prefer, you can just write the color directly on the tube with a sharpie. The little colored dots make it easy for me to recognize color family when sorting quickly through a bunch of tubes in my box. I put a small dot on the back side of the tube as well.

tubing-paint-7-packing-tape-425

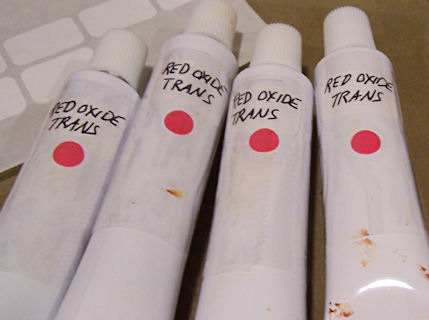
Surround the label and dots with clear packing tape. That will prevent the name from coming off. If you’ve written the names directly on the tubes with a Sharpie, it will protect it from rubbing off.

tubing-paint-8-all-done-425

All done. It’s a cinch!

9 Responses to “How to Tube Paint — Demo”

Great,

You can ship them at, …… :-P

Rene, LOL… :) )))

Who is a good supplier of paint tubes?

Keith

Hi Keith. I mentioned in the demo that ASW, Jerrys Artarama, and Dick Blick all carry paint tubes online. I’ve been using the two smaller sizes of the tubes from ASW/Jerrys, but I do know somebody who’s had problems with the caps on the largest size tubes. Perhaps there is too much pressure on the caps from that amount of paint. I haven’t tried the Dick Blick tubes.

Jamie… just had a light bulb moment!!! To fill the tubes with as little mess as possible, why wouldn’t it work to use the plastic cones for cake icing with a tip to dispense the paints into the tubes??? I’m going to try it tonight!!! :-) Great demo post.
Marc

Marc, next time you have a “light bulb moment” like that, could you please have it before I make up 58 tubes of paint? LOL… Fabulous idea. Let me know how it goes.

Ok… just filled three large tubes (170ml) and three small tubes (37ml) with Ultramarine blue using plastic cake decorating bag and a coupler (3/8″ appx diameter).
It works very well but there might be a little too much waste left in the decorator bag, and it was hard to hold the flimsy bag while filling it with the paint. That’s the con.
The pro is that it’s fast and no mess on the tubes themselves. Paint is shot directly into the bottom of the cone (tape the open end until you’re ready to fill tubes…it falls out otherwise, ask me!:), and the end of the tube is left clean and dry. I was actually able to use the self adhesive feature in the open end of the tube when I closed them this time.
If you had another pair of hands available, or rigged up a Rube Goldberg sort of contraption to hold the cake decorating bag while filling it with paint it would be a breeze.
Good possibilities with a little work.
:)

From my post above – “…shot directly into the bottom of the cone (tape…”

“cone” should read ‘tube’…

Jamie… I was talking to Kami this morning, nothing unusual there, and told her I was filling paint tubes. She called back a little later and out of the blue says “I know how you can make that go easier.”…”How???” thinking that she’d read this. She hadn’t. She thinks like us and suggested that I use Zip Loc bags, cut the corner off and seal and squeeze!!!

Dang, that’s going to work even better cause they’re stiffer, cheaper, they come in different sizes, and you can use the pressure of the sealed bag to force the paint down, like a syringe.

I tell ya… your gender is going to take over the planet some day!!! ;-)

Something to say?